Vulnerability Analysis
Vulnerability Analysis(脆弱性分析)
英語も日本語も仰々しい感じの単語ですが、脆弱性分析について。
脆弱性があれば、攻撃者はそこを突いてくるので、防御するためには、脆弱性を無くす。
攻撃者の視点を考えれば、ネットワーク経由(エージェントレス)で、認証情報なしで脆弱性をスキャンできることが望ましい。スキャン対象についても、特定のOSのみに限定したくない。
Metasploitで、exploitモジュールごとにcheckコマンドを叩けば、脆弱性の有無は確認できるが、かなりの手間。
脆弱性スキャナー
Webアプリの脆弱性スキャナーは除外して、有償製品で、無償版もあって有名どころは、
- Nexpose
- Nessus
あたり。
オープンソースでは、Nessusから派生した
- OpenVAS
の情報が豊富に掲載されている。
CEHのテキストには、
- GFI LanGuard
- Qualys
- SAINT
なども紹介されていたが、有料で、情報が少ない印象です。
Nexpose・NessusはMetasploitとの連携ができるらしく、スキャン結果のインポートだけでなく、msfconsoleからプラグインを使用して、操作が可能になっている。
ではさっそく、脆弱性分析のスタート、と思いきや、KaliにNexpose・Nessusはインストールされていない。KaliのサイトのToolsには表示すらされていない。
OpenVASはと言えば、Kaliのサイトに利用法が記載されているが、どうやらインストール方法ではないらしい。
さらに見ていくと、OpenVASは名称が変わって、GVM(Greenbone-Vulnerability-Manager)になったとのこと。
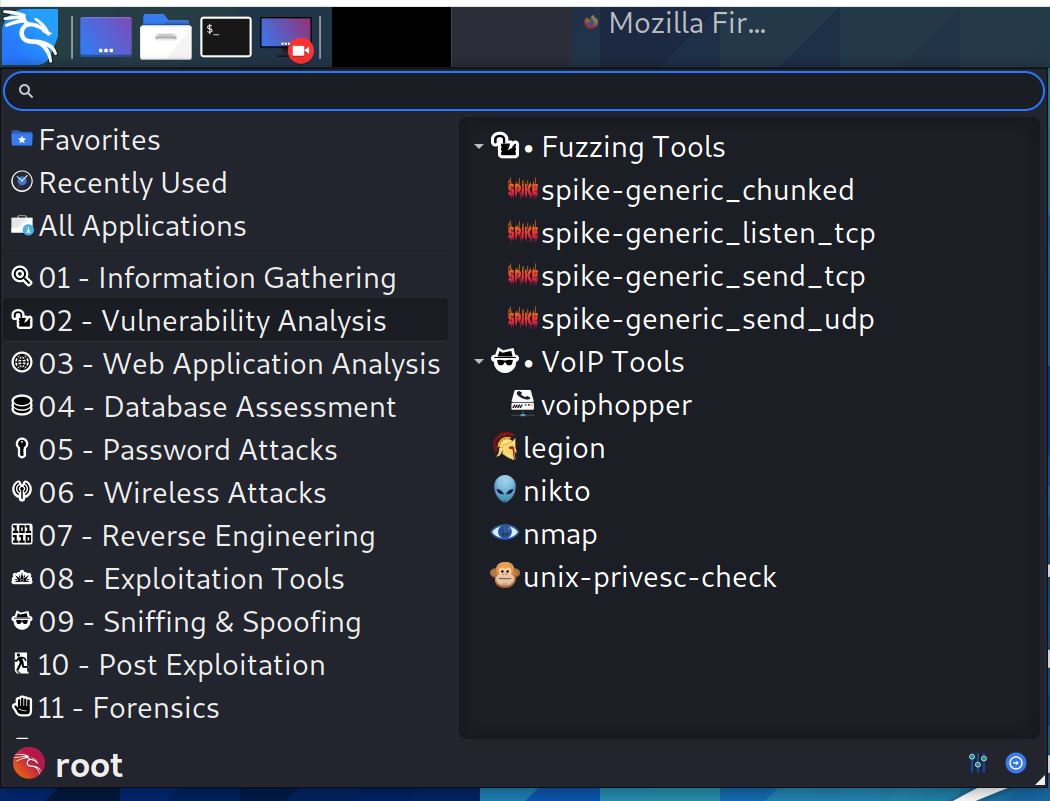
Kaliのツールメニューを見ると、こんな感じになっていて、自分で準備しないと、脆弱性分析できなさそう。
Todo
Kaliへ以下の3つをインストールして、検証。
- Nexpose
- Nessus
- GVM
いろんな人が言っているのは、脆弱性スキャナーは、それぞれ特徴があるので、複数組み合わせて使うべき、とのこと。
つ・づ・く
pandasの覚え
pandasの情報元
この本で一通り勉強しました。
この本は、GitHubにサンプルコードがあります。
本家のドキュメントは、こちら。
DataFrameの3要素
- インデックス
- カラム
- データ
各要素へのアクセス方法
movie = pd.read_csv('data/movie.csv')
columns = movie.columns
index = movie.index
data = movie.values
DataFrameの作成
スクラッチでの作成
df = pd.DataFrame(np.random.randn(6, 4), index=dates, columns=list("ABCD"))
ファイルを読み込み作成(よく使うもの)
#Excel
df = rpd.ead_excel(ファイルパス)#HTML
df = pd.read_html(io='https://example.com/')
よく使うパラメーター
index_col
encoding
ドキュメント
Input/output — pandas 1.3.0 documentation (pydata.org)
- DataFrameの全体の操作
df.head()
df.tail()
df.shape
df.size
df.ndim()
len(df)
df.count()
df.describe()
df.info()
- <要約統計>
mix,max,mean,median,std
- <欠損値の確認>
df.isnull().sum()
- <ソート>
df.sort_values(['columnA','columnB'] , ascending=False)
df.nlargest(10, 'columnA').nsmallest(5, 'columnB')
データの部分抽出
- インデックスが数字の場合
df.iloc[1]
df.iloc1,2,3:インデックスが1から3
df.iloc[1:10] : インデックスが1から10
df.iloc[1:10:3] : インデックスが1から10で、3個づつ
df.iloc[1:10,0:5] : インデックスが1から10で、すべての先頭から5つのカラム
df.iloc[1:10,:10] : インデックスが1から10で、すべての先頭から10つのカラム
- インデックスが文字の場合
df.loc['A']
df.loc'A','B','C':インデックスがAからC
df.loc['A':'C'] : インデックスがAからC
df.loc['A':'Z':3] : インデックスがAからZで、3個づつ
- カラムのみの選択
df.fileter(like='col')
df.filter(items=['one', 'three'])
Booleanインデックス法
- 単一条件
df_ser = df['colA'] > 10
- 複数条件
criteria1 = df.colA > 8
criteria2 = df.colB == 'hoge'
final = criteria1 & criteria2
df.loc[final]
- トップ5を除く
top5 = df.colA.value_counts().index[:5]
criteria=~df.colA.isin(top5)
df[criteria]
- クエリメソッド
depts=['A','B']
qs = 'colA in @depts and colB > 10'
df.query(qs)
- whereメソッド
df.where(criteria, other=100)
カラムの追加と削除
- フォーマット
df['colA'] = pd.to_datetime(df['colB'], format ='%H:%M:%S.%f')
mapping = {'A':'123','B':'345'}df['colC'] = df['colD'].map(mapping)
- lambda式
df['colE'] = df['colF'].fillna('').apply(lambda x : 'A' if x =='' else 'B')
- 独自ファンクション
def cust(x):
if x='':
return 'A'
else:
return 'B'
df['colZ'] = df['colX'].apply(cust)
集約
- 基本
group_col=['colA','colB']
agg_col={'ABC':['sum','mean'],'EFG':['mean']}
df.groupby(group_col).agg(agg_col)
※集約関数は独自ファンクション指定化
- グループオブジェクトの操作
grouped =df.groupby(['colA','colB'])
grouped.get_group( ('A','B') )
データ再構成
df.stack
df.unstack
df.melt
df.pivot_table
結合
- concat:複数のDataFrameを鉛直及び水平に連結する
- join:複数のDataFrameを水平に結合
- merge:2つDataFrameを水平に結合
- concat
鉛直
s_list=[df2016,df2017]
pd.concat(s_list)
pd.concat(s_list, keys=['2016','2017'], names=['year','Symbols'])
水平
s_list=[df2016,df2017]
pd.concat(s_list, keys=['2016','2017'], axis='colimns', names=['year','Symbols'])
pd.concat(s_list, join='inner', keys=['2016','2017'], axis='colimns', names=['year','Symbols'])
※concatのjoinパラメターはinner or outerしかない
- join
ohter = [df2.add_suffix('_2017'), df3.add_suffix('_2018')]
df1.add_suuffix('_2016').join(ohter, how='outer')
- merge
df1.merge(df2,on=['colA','colB'],how='left')


Information GatheringのInformation Gathering
Information Gathering(情報収集)
Information Gatheringは、ハッキングにおける情報収集フェーズを表すのですが、言葉が微妙に異なる。
CEHでは、
偵察(Reconnaissance)
スキャンニング(Scanning)
列挙(Enumeration)
が事前準備として位置づけられていて、
Footpringという概念でまとめられている感も。
Penetration Testing Execution Standard (PTES)という侵入テストのガイドラインでは、7ステップのうち、
事前準備(Pre-engagement Interactions)
情報収集(Intelligence Gathering)
脅威モデリング(Threat Modeling)
あたりが該当するのでしょうか。
Information Gatheringで使用するツール
Kaliのサイトでツールが分類されているので、情報収集フェーズで使用するツールを調査。
上記でリストにツールの名前があっても、Kaliにはインストールされてなかったり、Kaliのメニューにあるけど、上記にはなかったり、良く分かりません。。。
CEHのテキストでは、初手namp的に、いろんなことをnmapにやらせていた。
Metasploitのauxiliaryモジュールでも同等のことができる。
一旦、以下の表にまとめる。
| 分野 |
Kaliの ツール |
NMAP | Metasploit |
| DNS Analysis | dnsrecon | nmap -sSU -p 53 --script dns-nsec-enum --script-args dns-nsec-enum.domains=example.com <target> | auxiliary/gather/enum_dns |
| Live Host Identification | masscan | nmap -sP <IP Address/Subnetmask> | auxiliary/scanner/ip/ipidseq |
| Network & Port Scanner | masscan | nmap <IP Address> | auxiliary/scanner/portscan/syn |
| SMB Analysis | smbmap | nmap --script smb-os-discovery <Target IP address> | auxiliary/scanner/smb/smb_version |
| SNMP Analysis | snmp-check | nmap -sU -p 161 --script=snmp-info 192.168.0.25 | auxiliary/scanner/snmp/snmp_login |
| SSL Analysis | sslscan | nmap -v --script ssl-enum-ciphers -p 443 example.com | auxiliary/scanner/http/ssl |
いろんなツールがあるけど、結果はほとんど同じなので、個人の好みなのでしょうか。
nmapの遅さが気になるが、masscanは数倍速いので、ここは使い分けが必要と感じるところ。
良く分からない分類達
- IDS/IPS Idetification・・・ロードバランサ(lbd)とWAF(wafw00f)の検出だった
- Route Analysis・・・netdiscoverはライブホスト検索?
- SMTP Analysis・・・swaksはSMTPのテストに最適、という情報しか見つけれない
OSINT Analysisのツール
- Maltego
- spiderfoot
- theharvester
- recon-ng
Kaliでは上記が用意されているが、使用方法についての情報量が多くて、消化不良。
CEHでは、
- FOCA
- OSRFramwork
なども紹介されていた。
この時点でお腹いっぱいですが、これらのツールがあれば必要最低限の情報収集はできる、はず。
Active Directoryのデータ処理
Active Directoryの管理
Active Directoryを使用していると、ゴミデータが黙ったり、変な設定がいつまでも残っていたり、ということがある。
GUIでマウスをポチポチしながらの確認作業も、いつの間にか気が遠のいていく。。。
ユーザーとグループの出力
こちらのサイトを参考にさせていただき、ユーザーとグループの情報をCSV出力する。
- ユーザーの一覧のCSVファイル出力
csvde -u -f c:\adlist_u.csv -r objectCategory=user -l cn,description,memberOf
- グループの一覧のCSVファイル出力
csvde -u -f c:\adlist_g.csv -r objectCategory=group -l cn,description
ここまではOKだけど、出力した2つのファイルをどうやって結合するか。
ユーザーデータの構造
ユーザーは複数のグループに所属できる。
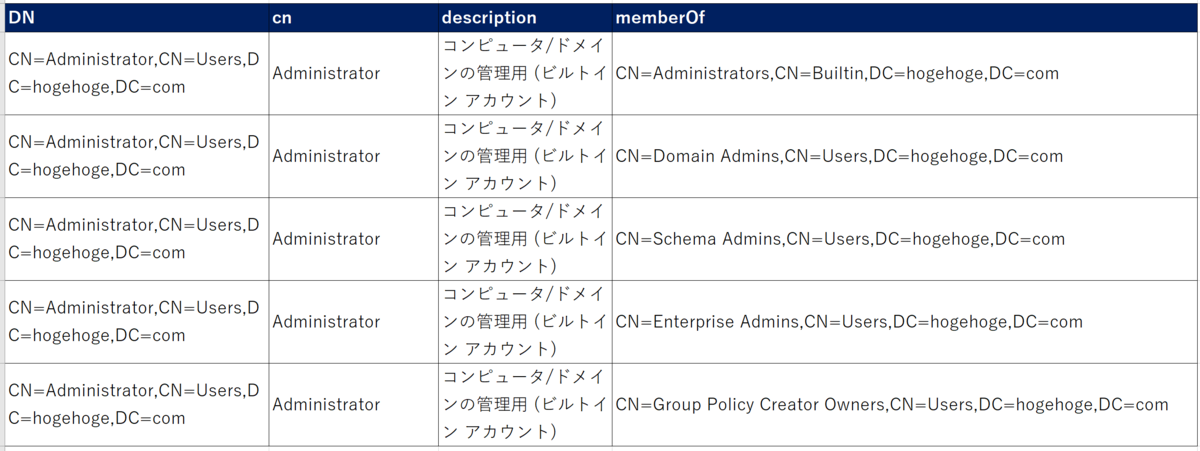
adlist_u.csvのデータを見ると、memberOfというフィールドに所属グループが表示されている。「;」で区切られて複数表示される。

これを、以下のようにグループ毎のレコードに分割したい。
Pythonでやってみる
今後ログの分析などを考えて、あと、少しカッコつけて、Pythonでやってみる。
jupyter notebookの環境で以下のコードを入力して実行。
import pandas as pd
#UTF-16でエンコードする
user = pd.read_csv('adlist_u.csv',encoding='UTF-16')
#所属グループを分割する
user['GROUP']= user['memberOf'].str.split(';', expand=False)
#リスト化されたものを複数行にする
user_group=user.explode('GROUP')
#CSV出力
user_group.to_csv('user_group.csv',encoding='utf_8_sig')
explodeが一撃で行の分割をやってくれる。
グループの一覧とユーザーの一覧を結合させる。
#グループの一覧を読み込み
group = pd.read_csv('adlist_g.csv',encoding='UTF-16')
#結合用フィールド作成
group['GROUP']=group['DN']
#結合
mg = pd.merge(group,user_group,on='GROUP', how='outer')
#CSV出力
mg.to_csv('mg.csv',encoding='utf_8_sig')
少し欲張って
これが出来るなら、ファイルサーバーのアクセス権限も見直したい。
こちらを参考に、以下PowerShellコマンドでCSVを出力する。
Get-ChildItem -path \\aa-server\share\*\*\* | where {$_.mode -match "d"} | Get-Acl | Select-object @{Label="Path";Expression={Convert-Path $_.Path}}, AccessToString |Export-Csv acl.csv -encoding Default
※階層の深さは\*で追加する。その深さの階層しか見ないので注意
CSVデータの AccessToStringがアクセス許可されたグループ・ユーザーで、改行コードで分割できる。
import pandas as pd
#UTF-16でエンコードする
acl = pd.read_csv('acl.csv',encoding='UTF-8')
#ACLを分割する
acl['GROUP']= acl['AccessToString'].str.split('\n', expand=False)
先ほどのデータとマージすれば、どのユーザー、どのグループが、どのフォルダのアクセス権があるのか、というリストが作成できる。
今後、ログの解析から、異常値の検出や予測などできればいいなぁ。
つ・づ・く
KaliのToolたち
Kaliには多くのツールが用意されている。
こちらに一覧表示されて、一通りの説明がある。
12のカテゴリでリストアップされたツールの数は以下の通り。
| カテゴリ | カウント |
| Forensics Tools | 23 |
| Hardware Hacking | 6 |
| Information Gathering | 67 |
| Maintaining Access | 17 |
| Password Attacks | 39 |
| Reporting Tools | 9 |
| Reverse Engineering | 11 |
| Sniffing & Spoofing | 33 |
| Stress Testing | 14 |
| Vulnerability Analysis | 27 |
| Web Applications | 43 |
| Wireless Attacks | 54 |
※2021年6月時点
少し混乱するのが、実際のKaliのメニュー表示は、カテゴリも、ツールの表示数も異なること。

上記は01-information gatheringを選択した画面。
サブカテゴリに分類され、表示されるのはわかりやすい。
メニューには、Dababase Assessment、PostExploitation、Social Engineering Toolsがあって、Maintaining Access、Stress Testingがない。
ツールの中には、複数のカテゴリにリストアップされているものがあり、集計すると以下の通り。
| ツール名 | カテゴリのカウント |
| THC-IPV6 | 5 |
| Maltego Teeth | 4 |
| cisco-auditing-tool | 3 |
| Yersinia | 3 |
| Burp Suite | 3 |
| zaproxy | 3 |
| WebScarab | 3 |
| cisco-torch | 3 |
| sqlmap | 3 |
| DotDotPwn | 2 |
| FunkLoad | 2 |
| Ghost Phisher | 2 |
| HexorBase | 2 |
| diStorm3 | 2 |
| inviteflood | 2 |
| iSMTP | 2 |
| iaxflood | 2 |
| dex2jar | 2 |
| CutyCapt | 2 |
| jboss-autopwn | 2 |
| copy-router-config | 2 |
| cisco-ocs | 2 |
| cisco-global-exploiter | 2 |
| chntpw | 2 |
| CaseFile | 2 |
| BBQSQL | 2 |
| crackle | 2 |
| Reaver | 2 |
| Xplico | 2 |
| Wireshark | 2 |
| Wifi Honey | 2 |
| sslstrip | 2 |
| SSLsplit | 2 |
| sqlsus | 2 |
| Sqlninja | 2 |
| smali | 2 |
| SIPArmyKnife | 2 |
| mdk3 | 2 |
| Recon-ng | 2 |
| jSQL Injection | 2 |
| Powerfuzzer | 2 |
| polenum | 2 |
| Parsero | 2 |
| p0f | 2 |
| ohrwurm | 2 |
| Nmap | 2 |
| Nikto | 2 |
| Metagoofil | 2 |
| apktool | 2 |
| SET | 2 |
THC-IPV6は、5つのカテゴリをカバーできると思うが、名前の通りIPv6のためのツール。
その他のツール、見覚えがある名前だと思ったら、CEHのテキストに登場していました。
ツールの多さに途方に暮れてしまいますが、まずは、
あたりで、使えるツールを調べよう。
つ・づ・く
ECE登録 ~その1~
初めてのECE(EC-Council Continuing Education)取得
どのカテゴリもハードルが高そうで、まずは「Education Seminar/Conference/Event」で1時間1ポイントが取得できるかに挑戦。
ポイントを得るためには、
「Submit any document/email confirmation/badge which confirms you attended the IT Security event.」
ということで、何かしらの証明が必要らしい。
対象イベント
参加登録しても、セミナー配信URLが送信されてくるだけ。
確かに、コロナ以前は受講票とかメールで送信してくれていたが、
オンラインで受講した証明ってどうすれば良いのか?
仕方がないので、オンラインセミナーの開始と終了の画面コピーをPCの日時と合わせて取得しておいた。
その後、以下のイベント登録画面から、登録して申請する。

ハマりポイント
- 登録日付が1日単位
- 添付できるファイルのサイズが2MBまで
- インジェクション防止のためか、記号が入力できない
パワポに画面コピーを貼っていたら、ファイルサイズが凄いことに。
パワポの各ページをJPGに変換して、さらにそのサイズを縮小して、Zipに圧縮してアップロード。
ホントにこれで、認めてもらえるのだろうか。
結果
2-3日経過後サイトをのぞくと、「Approved」、ということで8ポイントゲット!

この種のイベントでポイントが取得できるなら、3年で120ポイントは大丈夫かも。
オンラインセミナーは後日、アーカイブが出るので、同じ方法で出来るかわかりませんが、ポイントを取得するのがECEの趣旨ではないと思うので、継続的に知識を蓄えます。
つ・づ・く
CEH継続の道のり
CEHを維持するために、1年間80ドルの費用とECE(EC-Council Continuing Education)ポイントを3年間で120貯めないといけない。
専用のWEBサイトが割り当てられ、そこで管理される。
1年間80ドルの費用

試験に合格した月の、1年後の翌月までに、80ドルを支払う必要があるらしい。
ECE(EC-Council Continuing Education)ポイント

2024年の5月31日までに、120ポイントを貯める必要がある。
上記の「Event Type」が以下の25種類の「Category Name」のいずれかになる。
その多くは、意味が不明、または意味が分かっても無理、と思えるもの。
| Category Name | Category Credits | Proof Of Specification |
|---|---|---|
| Association/Organization Chapter Meeting (per Meeting) | 1 | Submit any document/email confirmation which confirms you attended the chapter-based IS-related organizations meeting. |
| Association/Organization Chapter Membership (per Association/Organization) | 3 | Submit any document/email confirmation which confirms you are the member of chapter-based IS-related organizations. |
| Association/Organization Membership (per Association/Organization) | 2 | Submit any document/email confirmation which confirms you are the member of IS-related organizations. |
| Author Article/Book Chapter/White Paper | 20 | Submit any email confirmation/ web link which confirms you are the author of an IS-related article/book chapter/white paper. Note - Publication of material on personal blogs is not eligible for credits. |
| Author Security Tool | 40 | Submit the web link which confirms you are the author of the Security tool. |
| Authoring Book | 100 | Submit any document/ web link which confirms you are the author of an IS-related book which published traditionally or on an electronic book site. |
| Authoring Course/Module | 40 | Submit the publicly available link/ web page of the course that displays the authors name is required to be submitted. In case of a physical book, an announcement publicly available will be accepted. |
| Certification Examination Related to IT Security | 40 | Submit the digital copy of the IT Security related exam certificate. |
| EC-Council Beta Exam Testing | 80 | Official document/email confirmation which confirms you have completed the EC-Council Beta Exam. |
| EC-Council ECE Examinations | 120 | Submit the digital copy of the EC-Council exam certificate. |
| EC-Council Exam Survey | 20 | Official document/email confirmation which confirms you have completed the EC-Council exam survey. |
| EC-Council Item Writing | 100 | Official document/email confirmation which confirms you have participated in the EC-Council Item Writing. |
| EC-Council Job Task Analysis Survey | 40 | Official document/email confirmation which confirms you have completed the EC-Council JTA survey. |
| EC-Council Review Board | 80 | Official document/email confirmation which confirms you are the review board member at EC-Council. |
| EC-Council Standard Setting | 60 | Official document/email confirmation which confirms you have participated in the EC-Council Standard Setting. |
| Education Course | 1 | Submit the course completion certificate. Note - Courses for which no course completion certificate is given are not eligible for credits. |
| Education Seminar/Conference/Event | 1 | Submit any document/email confirmation/badge which confirms you attended the IT Security event. |
| Higher Education Per Quarter | 10 | Submit a scanned copy of the Official Web based transcript from college/university which would have the grades is required. |
| Higher Education Per Semester | 15 | Submit a scanned copy of the Official Web based transcript from college/university which would have the grades is required. |
| Identify New Vulnerability | 10 | Submit any proof of the disclosed vulnerability and documented evidence claiming the ownership of the report published in a public forum. Vulnerabilities that are not disclosed publicly cannot be granted ECE credits. |
| Presentation | 3 | Submit any document/email confirmation which confirms you were the speaker or presenter of the IT Security event. Note - Members may not claim additional credits for presenting the same topic multiple times. |
| Reading an Information Security Book/Article Review/Book Review/Case Study | 5 | Provide book/article/case study review of minimum 250-500 words. The review should be presented with clarity of points and it is not plagiarized. |
| Teach New | 21 | Submit a scanned copy of a letter from the head of the department/company/organization on official letterhead indicating that you are or were the instructor for the IT Security course. |
| Teach Upgrade | 11 | Submit a scanned copy of a letter from the head of the department/company/organization on official letterhead indicating that you are or were the instructor for the IT Security course. Note - Instructors may not claim additional credits for teaching the same material multiple times. If course syllabus is updated every year then only you can claim credits. |
| Volunteering in public sector | 1 | Submit letter from the concerned public sector authority about the number of hours volunteered. |
取得の履歴を以下に掲載します。